Welcome the Pot Prof’s complete guide to growing weed!
Stage 1, Part 4: How to germinate and plant cannabis seeds.
Germination is easily the most anticipated moment for beginner growers. Even for seasoned growers, the moment when they are ready to sprout their first seeds and begin a new grow cycle is extremely exciting. It’s the beginning of a long process and journey at the end of which you will have large healthy flowering marijuana plants ready to harvest.
That entire journey begins with the seed. Seeds themselves are one of the most marvelous creations of nature. Believe it or not there was a time on the planet Earth when flowering plants did not exist and seeds did not either. But once seeds and flowers evolved, they quickly took over the Earth, and now these little nuggets of energy are all that plants need to create new life. Just add water and a little bit of light with moderate temperatures and the seeds will produce the first tiny sprouts.
Hopefully by this point you have been able to acquire seeds, set up a grow tent, and buy nutrients. All of that preparation has come down to this one moment and now you will be ready to get the growing stage underway. Before you do enter into the growing stage you must learn how to germinate your marijuana seeds.
Links to check out other stages of this guide:
- The Beginning: The 3 Stages Of Growing Cannabis
- Stage 1: Grow Room, Nutrients, Seeds And Germination (<– You are in this section!)
- Stage 2: Vegetative And Flowering Growth
- Stage 3: When And How To Harvest Marijuana
WHAT DO I NEED TO KNOW?
Let the growing begin! There are several different ways to germinate seeds and grow sprouts for the first week or so. Most of them work well, but some of them require more effort than others.
This section will cover the following topics:
- Germinating seeds: basic methods for inducing seeds to start growing
- Method 1: Paper plates
- Method 2: Peat Pellets
- Method 3: Direct planting
- Planting sprouts: what containers to plant sprouts in, feeding schedules for young sprouts
- Lighting and watering guides for the first week of growth
- To feed or not to feed?

Germinating seeds: basic methods for inducing seeds to start growing
Germinating seeds is surprisingly easy. After all, seeds contain within them almost everything a young plant need to get going. You will only need three other things other than the seeds themselves: water, air, and heat.
Because seeds have food for plants inside of them, all you have to do to activate the seed is give it water and heat. Water hydrates the cells within the seed and begins the growth process. When the cells in the seed are properly hydrated they begin to release hormones that activate the growth of the root and stem.
The presence of heat simulates the coming of Spring and Summer. Of course, you don’t want to make your seeds too hot. You just want to give them a nice 70 to 90 degree heat source so that they stay warm. The heat will also help the cells grow and make it easier for enzymes within the cells of the seed to activate and do the work they are there to do.
Air is the final piece of the puzzle. While it might not seem like air is something a seed would need much of, it is good to give the seeds a little bit of air if possible in order to simulate the pockets of air that would be surrounding the seed in soil.
Cells within the seed will begin the process of photosynthesis as they grow, which requires taking water and carbon dioxide from air. The products of this process are oxygen and glucose (food). Therefore, while this might not be a key consideration within the first 48 hours, in order to take carbon dioxide from the air, a young seedling will need access to some air eventually.
The following three methods will make sure that the seeds remain moist while also giving them enough heat and eventually air to get started with the growing process.
Instructions
How To Germinate Cannabis Seeds
Method 1: Paper Plates

The first method we will discuss for germinating your seeds is the easiest method. For this method you will need a few materials to get started
Materials
- Two clean paper plates
- Paper towels
- Glass jar or cup
- Water
- Seeds
Step 1: Put the seeds in a jar of water
Fill a jar with water. Place the seeds in the water and let them sit overnight. At first, the seeds should float. If a seed does not float, it might be a dud. The purpose of doing this is to fully saturate the inside of the seed with water.
After a few hours they will have absorbed some water and will have sunk to the bottom. When the seeds sink to the bottom of the jar or cup, they are ready to begin the germination process. Just to be sure that they are fully saturated, leave them in the jar for at least 12 hours, and up to 24 hours.
Step 2: Soak the paper towels
Take 4 sheets of paper towels and soak them in water. Make sure that they are soaked all the way through. They do not need to be completely sopping wet or dripping with water. They just need to be soaked well enough that they won’t dry out very quickly.
A good way to make sure that the paper towels are wet but not too wet is to put a little bit of water in a dish and let the paper towels soak up as much water as they can naturally. Then lift the paper towels up without squeezing them and let the excess water drain out.
Step 3: Put the seeds on two paper towels
Take two of the wet sheets of paper towel and place them on a paper plate. Gently place each cannabis seed on the paper towel. Make sure that you leave at least an inch or two of space between each seed.
It is also a good idea to not overcrowded the plate if you are germinating more than four or five seeds. If you have more than four 5 seeds then you may want to consider repeating this process and creating multiple batches.
Step 4: Cover with remaining two paper towels
Take the two remaining wet sheets of paper towel and place them over the seeds. Do this gently and remember not to press down on the paper towels.
The seeds will appreciate the water that is soaked well into the paper towels so avoid squeezing them unless there is clearly too much water and they are dripping a lot.
Step 5: Cover with remaining two paper towels
Place the remaining paper plate over the seeds so that they are immersed in darkness. It is okay if a little bit of light gets in between the paper plates.
Just make sure that the seeds are generally covered in order to simulate the lack of lighting they would experience in soil.
Step 6: Store overnight in a safe location
Place the plates with the seeds in a warm location. The seeds will need temperatures between 70 and 90 degrees Fahrenheit in order to germinate.
It is also a good idea to choose a location that is out of the way and unlikely to be bothered by pets or other humans.
Step 7: Let them sit for 24 to 48 hours
Once you have completed the above steps, the only thing left to do is wait. Seeds need a little bit of time to germinate. They will usually have completed the first stage of germination after 24 to 48 hours depending on the strain. You can check the towels periodically to make sure that they are wet is enough. Otherwise, just sit back and relax.
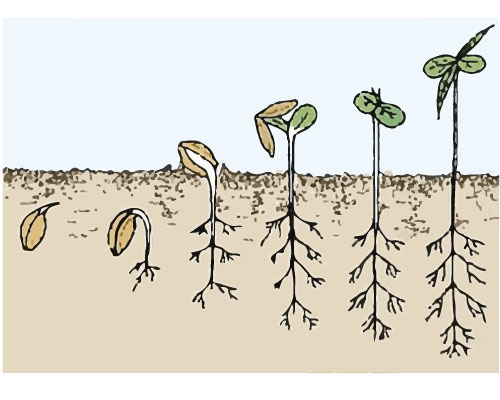
After 24 to 48, hours check the paper plates by removing the top plate. If you need to, go ahead and remove the first layer of paper towels as well until you can see the seeds clearly. You will not damage them by removing the paper towels. The seeds should have split lengthwise along the seam. A short white taproot should be visible.
The taproot is the first part of the seed to sprout. The main purpose of the taproot is to absorb water and nutrients to allow for the rest of the plant to grow. If you do not see a Taproot then leave the seed in wet paper towels for a bit longer until the Taproot is visible.
the Taproot should be given enough time to grow to a length of at least a quarter of an inch before the seedling is ready to be planted. If the Taproot is not at least a quarter of an inch long leave the seedling in the paper towels to grow a bit longer. Once the Taproot is a quarter of an inch or half an inch long your siblings are ready to be planted.
Method 2: Plugs and peat pellets
Because one of the hazards of sprouting seeds in paper towels comes from the eventual need to handle them with your hands many people prefer to use peat pellets. Germinating seeds inside of peat pellets you can I void touching the plants when you transfer them two the growing pots. simply plant the entire pellet into the pot with the Sprout growing out of it and the pellet grill disintegrate and merge with the growing medium.
The one downside to this method is that if you are using coco coir or any medium that does not involve soil the pellet may not fully disintegrate or disappear and can make watering and feeding a little bit trickier. After all the material in the pellet will drain differently than the soil around it so as the plant grows there will be a little pocket of soil close to the root ball that may contain an even amounts of nutrients. If nutrients build up in the palate material overtime this could cause nutrient burn. This is something to consider when choosing a method for germination.
Step 1: Hydrating your pellets
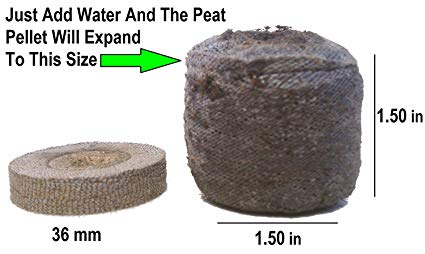
When you buy peat pellets they often come in a dehydrated State. They look like little hockey pucks and you will need to add water in order to get them to expand.
If the pellets come in a tray simply add water to the tray as directed on the container. You will often have to add at least one and often 2 L of water to the tray in order to get all of the peat pellets to expand properly
Step 2: Planting your seads
Once the peat pellets have Then hydrated and properly expanded, place a cannabis seed inside each one. make sure that the seeds are not too deep inside of a pellet.
They should sit close to the surface and perhaps with a little bit of the top of the seed showing. That way when they begin to sprout the taproot will grow down into the peat while the stock will begin to grow up into the air.
Step 3: Hydrate the pallets
Germination can take 24 to 48 hours depending on the strain marijuana. In order for the pellets to maintain proper hydration you may need to periodically add water to the tray.
The pellets will absorb the water from the tray and keep the seed moist. Make sure to watch the tray closely so that it doesn’t dry out.
Step 4: Transplant sprouts
Once your Sprouts have grown for a day or two within the palate they will be ready to transplant into a full pot of soil for growing medium. To do so simply remove each pallet with each ceiling from the tray.
Dig a hole in the growing medium that is large enough to fit the pellet and then place the pellet ins a hole. Cover the pellet so that the seedling is sitting even with the surface of the growing medium.
And that’s it you’re good to go!
Method 3: Direct planting
Direct planting is the most traditional way to plant a seed. This method is about as simple as it sounds. Simply place the seat in a small hole in the soil or growing medium and water It. Seeds I’ve been grinding this way since they evolved and Humanity has been planting seeds this way since the invention of agriculture.
The main downside to this method is that it is a bit harder to control the moisture content of the soil around the seed. Because you are planting the seed directly into a large container of soil through which all of the water will eventually bread you may have to water the seed a little bit more frequently to keep it moist. just make sure that you don’t overwater. You don’t want the sea to be completely covered in a puddle of water. The growing medium should Simply Be moist when to the touch.
Step 1: Dig a hole with your finger
With your thumb or pointer finger dig a small hole in the soil. The whole should be no more than a quarter of an inch deep and preferably less deep.
In fact, calling it a whole may be an exaggeration. The whole should be just a small depression into which you can fit one seed.
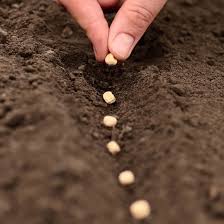
Step 2: Plant the seed
Place one seed in each hole You Dig. Make sure that you only put one seed in each pot. After all, this is the pot plant will live for the rest of its life.
You want to make sure that the seed and the eventual adult plant have enough room to grow to their full potential. If you are planting multiple seeds in the same container make sure that the seeds have at least 3 ft feet of room on either side between seeds.
Step 3: Cover the hole
Covering the hole is surprisingly tricky. If you don’t have much experience with planting and growing seeds you might be tempted to press down on the soil to push it into the hole. Don’t do this.
Just push a little bit of soil into the hole so that the seed is mostly covered. Some amount of the seed should be visible from the surface so that when the seed sprouts the young seedling is able to orient itself properly towards the light at the surface.
If you press down on the soil you will compact the soil and push all of the little spaces between the grains of sand and dirt and growing medium together. B spaces are important because each space will eventually be filled with a little bit of Water and Air.
If you push down on the soil the soil may not be able to absorb as much water and the Sea could dry out faster. Additionally, some seeds that are hacks to tightly in the soil will not be able to open because the soil around them will force them shut.
Step 4: Step for water accede
With a spray bottle gently water the seed. For this first watering feel free to be a little bit more generous with the water you give. Fully soak the soil and growing medium around the seed.
Over the next 24 to 48 hours this first watering may evaporate in the warm conditions in which you are growing. If you notice that the growing medium looks dry or feels dry to the touch feel free to water the seed one more time with smaller amount of water. The key is to not over water.
Step 5: Step five sit back and wait
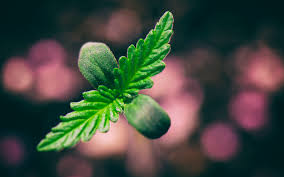
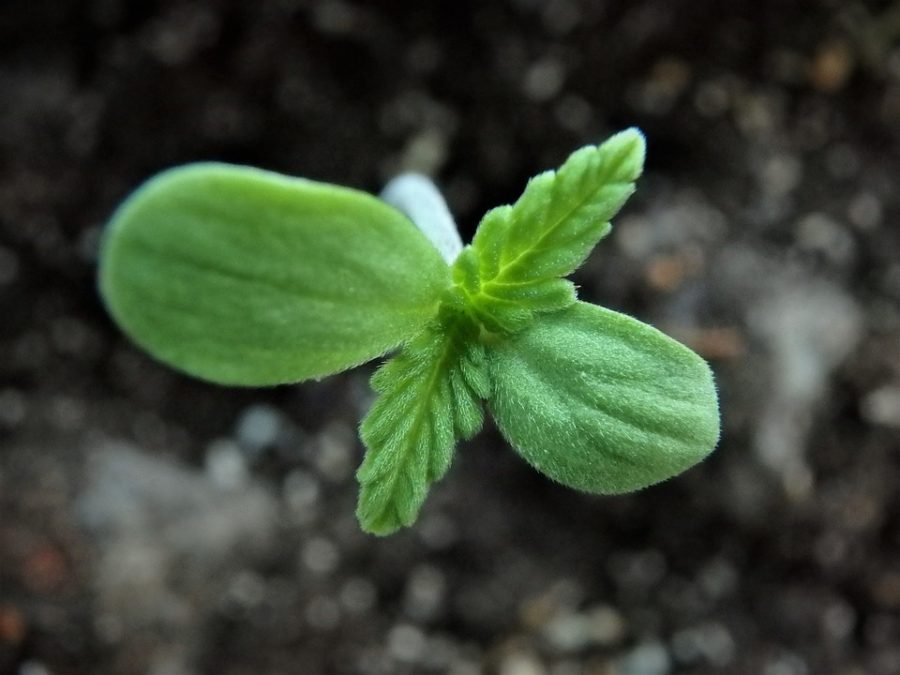
After 24 to 48 hours, you sprouts should begin to grow. The seeds will split open in the soil the taproot will grow down. Eventually a stock will grow up with two baby seedling leaves.
They may not look like marijuana leaves quite yet because they are not mature vegetative stage leaves. This first round of leaves is just there to get the plant going and help it produced the first set of mature leaves.
And there you have it! if you follow the directions properly you should have a sprout growing in a large pot or area where eventually the mature marijuana plant will reside.
With this math and you will not have to transport the seedling to any pot since it will already be growing in the location in which it will spend the rest of its life.
Planting sprouts: what containers to plant sprouts in, feeding schedules for young sprouts
By now you have hopefully set up your planting pots and your grow tent. All of your materials should be set up and ready to go so that your seedlings can take root in the location where they will be growing. Make sure that the growing medium is slightly moist so that you introduce your seedlings into a moist environment.
There are several ways to plant seedlings and some people prefer to take some precautions in these early stages. For instance, some Growers prefer to grow their seedlings in smaller containers for the first week or so of their life cycle in order to protect them from any harsher environments that they might find within the grow tent. Other people prefer to place the seedlings directly into the environment they will spend the rest of their life in order to avoid the stress of transplantation.
Let’s take a look at the merits of transplantation as well as its downsides.
Transplanting seedlings
Some Growers prefer to keep the ceilings in smaller pots for the first week or so of their life. When the seedlings have grown enough to stand on their own they can be transferred to the containers where they will grow for the rest of their growth cycle.
One reason to avoid doing it this way is to avoid the stress that would be put on a Seedling during the transplanting process. While this is not a huge risk there is some danger that transplanted seedlings will be stressed by the move and their health will suffer could suffer. the reason is that as the young seedlings Roots grow they will naturally grow through the medium they are put into. By removing them from that first medium you may disturb their growth potential.
If you do decide to transplant make sure that you transplant the seedling with all of the soil or grow medium around the roots intact. If possible avoid transplanting seedlings by removing them completely from the dirt. If you have grown your seedlings in growth medium or soil it is not advisable to allow the roots to be exposed to the air during transplantation.
How to plant seedlings
Once your seeds have begun to sprout and the Taproot is at least a quarter of an inch long, it is time to plant the seedlings into a growth medium.
This process is fairly simple but there are a few important steps to follow so make sure that you pay close attention and take care not to accidentally plant the seedling upside down or too deep within the grow medium
Step 1: Dig a small hole with your finger
With your thumb or index finger make a small hole about a quarter of an inch deep in the growing medium of the pot where you will be planting your ceiling. Gently dig a hole enough to cover the first quarter of an inch of your finger. Do not press down on the soil and do not make the hole too wide.
Step 2: Remove a sprout from paper towels
Gently remove a seed from the wet paper towels. You can remove the seeds by simply picking them up between your fingers. Some Growers prefer to use tweezers.
The benefits of using tweezers or other tools is that you will not introduce bacteria on to the seed from your fingers. Make sure that any tweezers or tools are sterilized by holding them under a flame and then letting them cool off before transplanting your seeds
Step 3: Position the sprout
Place the seed into the hole with the Tap Root facing down. It is okay if the Taproot does not touch the bottom of the hole. Simply lean the seedling against the side of the hole so that the Taproot is facing down and the two halves of the split seed are at or near the surface of the soil.
Step 4: Cover the roots
Dently fill the hole in with the soil that you removed to make it in Step one. Do not press down on the soil or pack the soil in against the roots.
Just gently push soil into the hole until the Taproot is completely covered. You should still be able to see the top of the seed when you are done.
Step 5: Water the sprout
The soil or growing medium that you place the seed into should be moist already. However if you are feeling so inclined you can consider adding a few drops of ph balanced pure water to the seedling after planting. The water will help the seedling adjust to its new environment over the next for 24 hours.
First Week Care Guide: How to tend to the sprouts during their first week of growth
Watering during the first week of growth
Believe it or not many seedlings do not need any feeding during the first week of growth. The reason is that seeds are themselves packed full of nutrients and energy to help the young seedling thrive. While this doesn’t mean you should avoid feeding them, it does mean that if you do not want to risk overfeeding the young seedlings then you do not have to feed them at all. Of course, this is a rule of thumb and could vary between strains so make sure that you consult with instructions that are specific for your strain.
the main reason why you may not want to feed your ceilings with nutrients is that it is very easy to burn seedlings with nutrients accidentally. Seedlings are extremely delicate and it is often difficult to create a mixture that is light enough to still be effective in giving them nutrients without overfeeding them. One common mistake that beginner Growers make is that they think the seedling needs more nutrients than does and therefore over feed the young plant in the first week. In order to avoid this outcome when in doubt avoid feeding your plants for the first few days or week of their growth cycle.
If you have properly moistened the growing medium or soil and you may not even need to give the seedlings water for the first week. Too much water can drown young seedlings. After all Roots need air just like leaves do. If the soil is too muddy or the grow medium is too wet then are will not be able to reach the roots and the plant could drown. Since seedlings do not need too much water in the first week as long as the soil is relatively moist then you do not need to water them. just make sure that the soil are growing medium doesn’t dry out completely.
Of course if you do decide to water your seedlings make sure to use a spray bottle to provide enough moisture to saturate the soil without knocking the plant over. Sometimes watering cans or other watering tools provide heavy stream of water that can knock over seedlings. Knocking over ceiling is not the end of the world but it can damage the plant. by using a spray bottle you can gently provide moisture to the ceiling without knocking it over or displacing soil from around the Taproot.
Whatever you decide to do always always always make sure to pH balance your growing solution before feeding your seedlings. Seedlings are delicate and respond quickly to changes in PH. Any damage that is done to the ceiling could result in the failure of the plant to enter into the first stage of Vegetative growth. sense often stress during the seedling stage from ph balanced and stunt the growth or prevent the plant from reaching its full potential later on make sure to take extra caution 2 pH balance any water or feeding solution you give it.
Transplanting seedlings
Believe it or not many seedlings do not need any feeding during the first week of growth. The reason is that seeds are themselves packed full of nutrients and energy to help the young seedling thrive. While this doesn’t mean you should avoid feeding them, it does mean that if you do not want to risk overfeeding the young seedlings then you do not have to feed them at all. Of course, this is a rule of thumb and could vary between strains so make sure that you consult with instructions that are specific for your strain.
the main reason why you may not want to feed your ceilings with nutrients is that it is very easy to burn seedlings with nutrients accidentally. Seedlings are extremely delicate and it is often difficult to create a mixture that is light enough to still be effective in giving them nutrients without overfeeding them. One common mistake that beginner Growers make is that they think the seedling needs more nutrients than does and therefore over feed the young plant in the first week. In order to avoid this outcome when in doubt avoid feeding your plants for the first few days or week of their growth cycle.
If you have properly moistened the growing medium or soil and you may not even need to give the seedlings water for the first week. Too much water can drown young seedlings. After all Roots need air just like leaves do. If the soil is too muddy or the grow medium is too wet then are will not be able to reach the roots and the plant could drown. Since seedlings do not need too much water in the first week as long as the soil is relatively moist then you do not need to water them. just make sure that the soil are growing medium doesn’t dry out completely.
Of course if you do decide to water your seedlings make sure to use a spray bottle to provide enough moisture to saturate the soil without knocking the plant over. Sometimes watering cans or other watering tools provide heavy stream of water that can knock over seedlings. Knocking over ceiling is not the end of the world but it can damage the plant. by using a spray bottle you can gently provide moisture to the ceiling without knocking it over or displacing soil from around the Taproot.
Whatever you decide to do always always always make sure to pH balance your growing solution before feeding your seedlings. Seedlings are delicate and respond quickly to changes in PH. Any damage that is done to the ceiling could result in the failure of the plant to enter into the first stage of Vegetative growth. sense often stress during the seedling stage from ph balanced and stunt the growth or prevent the plant from reaching its full potential later on make sure to take extra caution 2 pH balance any water or feeding solution you give it.
Lighting for the first week of growth
Lighting for the first week of growth is fairly simple. You can begin to introduce your seedlings to a regular vegetative growing light routine. This may mean that you keep the lights on all the time.
However the key is to to let the plants acclimate to the environment they will be growing in and boost their health so that they enter the first stage of vegetative growth with as much energy and stability as possible. Therefore it is difficult to give them too much light in the beginning.
One thing to keep in mind is that the lighting you do provide to the ceiling should be direct and close by. If the lighting is too far away or not Direct then the seedlings will try to grow towards the light. they will reach in the direction of the light and end up growing very long. While this isn’t always such a big deal it can stress the plan and cause it to grow taller than necessary.
Conclusion
After about a week your young marijuana seedlings should have produced their first pair of mature vegetative leaves. At that point, they will be ready to enter the full first stage of vegetative growth.
If you have successfully reached this point then congratulations you have finished the first stage of growing weed. The first stage of growing weed is all about preparation and getting started and you have done just that. Give yourself a pat on the back!
When you are ready to head over to the next stage of the sky to learn about the vegetative growth stage. This is the stage where your plants will add most of their height and produce several tops we’re Buds and colas will form depending on how you grow them.
The vegetative growth stage is the most complicated stage of all and will require a lot of study and care of your plants. At the end of that state of the vegetative stage, you will have marijuana plants that are healthy and ready to flower. Good luck!
Free How-To Guide For Growing Marijuana
Subscribe to our newsletter to receive a free downloadable e-book version of our complete how-to guide for growing marijuana. Don't worry! We won't spam you or send you useless emails.
Connect with us on social media: