Welcome the Pot Prof’s complete guide to growing weed!
Stage 2, Phase 1: Guide to growing cannabis during the early vegetative growth phase.
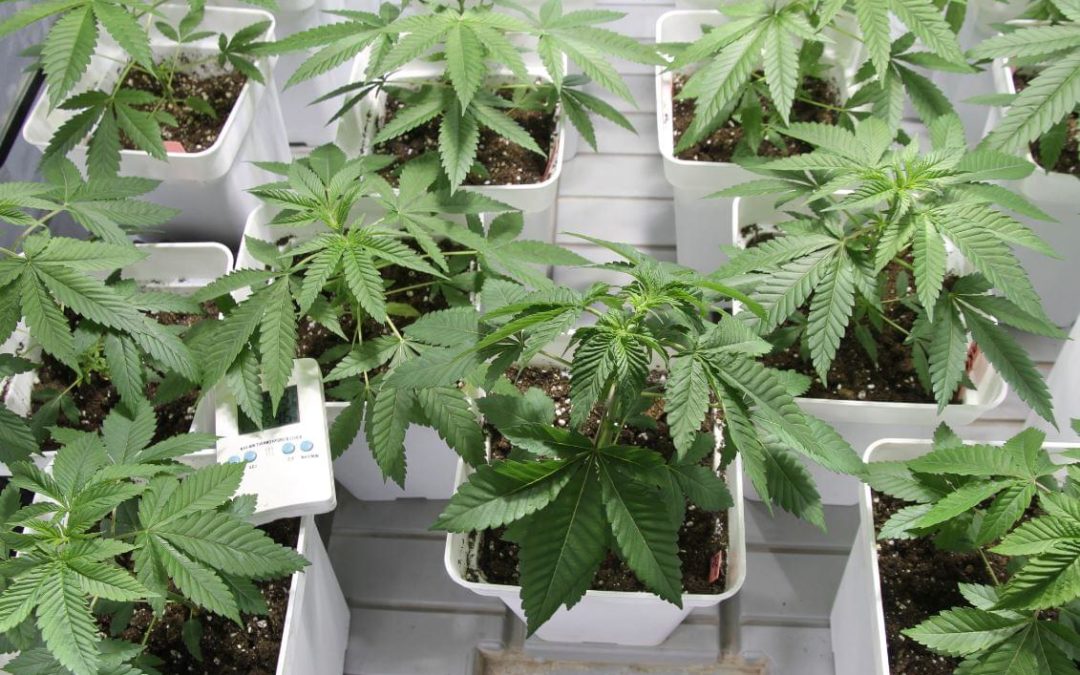
Early vegetative growth is all about helping your tiny sprouts grow into mature healthy marijuana plants. Cannabis sprouts require very specific treatment in order to grow optimally. By providing them with the nutrients they need at the right times, you can help them put on about a third of their total overall growth during this time.
The main theme of the early vegetative growth phase is: gentleness.
Be gentle with cannabis plants when they are young
It’s important to be careful and gentle with young cannabis plants. They have just emerged into the world and are still getting used to their surroundings.
Watch for effects caused by small variations in:
- Nutrient feedings
- pH balance
- Leaf colorations
- Lighting imbalances
- Airflow
- Temperature and humidity
Small changes can all have large effects on young plants ability to grow well. If you notice any problems make sure to treat them now so that they don’t lead to permanent damage which can stunt growth later.
Finally once your plants have grown to what could be termed an “adolescent stage,” you can begin to train them. Training your plants will prepare them to put on the next third of their total growth during the late vegetative stage.
Low stress training & topping
Training is a low-stress way of making sure that your plants have a lot of room to grow and can produce larger colas than they otherwise would. If you are ready to try some more advanced techniques, you can also top your young cannabis plants once they have put on at least five pairs of families.
We will go over all of these techniques as well as optimal feeding and watering schedules. Let’s begin with the feeding and watering schedules now so that you can know exactly what to do for your young sprouts to get them to where they need to be by the end of this phase.
Links to check out other stages of this guide:
- The Beginning: The 3 Stages Of Growing Cannabis
- Stage 1: Grow Room, Nutrients, Seeds And Germination
- Stage 2: Vegetative And Flowering Growth (<– You are in this section!)
- Stage 3: When And How To Harvest Marijuana
WHAT DO I NEED TO KNOW?
Stage 2, Phase 1 starts with an adjustment period as plants get used to their new environment and watering schedule. These first few weeks are a delicate time, so keep an eye out for problems.
This section will cover the following topics:
How to set up a watering and lighting schedule and balance nutrients and PH levels
How to train marijuana plants to take full advantage of the growth area under the grow light
How to top cannabis plants to create more colas and increase the maximum yield of your grow

Instructions
Early Vegetative Growth: Guide To Growing Cannabis
How To Set Up A Watering And Feeding Schedule For Cannabis
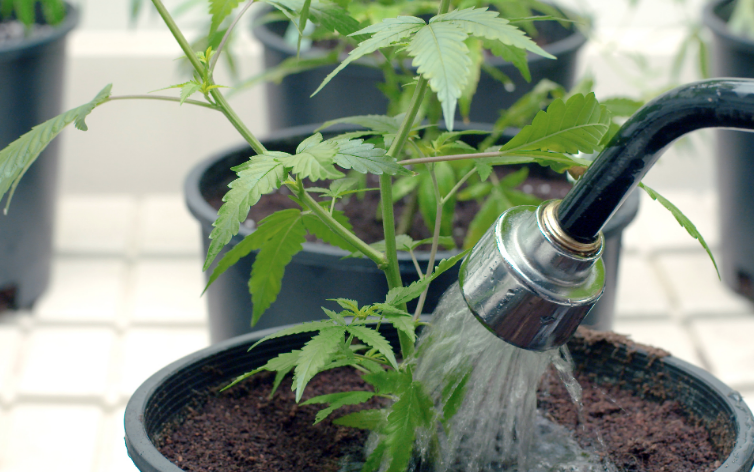
A solid watering and feeding schedule is the core foundation of your growing operation. Without a plan for when and how you are going to feed your plants, you will not be able to control their growth.
Watering and feeding schedules are also very important for regulating the amount of nutrients that the plants get each phase of growth. In the early vegetative growth stage it is important that a certain amount of each of the three main macronutrients:
- Nitrogen (N)
- Potassium (K)
- Phosphorus (P)
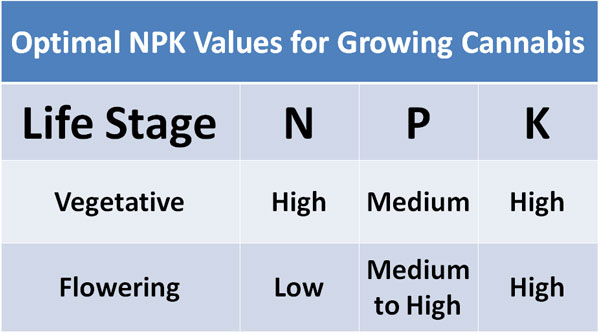
Best NKP ratio for growing Cannabis
Growers represent these three elements as NKP. The relative proportion of each of these three nutrients will be different for each phase of growing, and you will see three numbers on fertilizers that represent the NKP levels in the fertilizers.
So for instance, if a fertilizer shows 6-3-2: 6 indicates the level of Nitrogen, 3 indicates the level of Phosphorus and 2 indicates the level of Potassium. 6-2-3 is a good ratio for the early days of the growth stage since it is high in nitrogen and phosphorus.
A good growing schedule will show exactly which ratios of NKP to give your plant at each phase of the grow cycle. Thankfully, you don’t need to be super exact about this in order to get good results. However, the more exact you are with your measurements of NKP, the more likely you are to have big happy plants.
You can read more about NKP ratios on Maximum Yield, and we will go deeper into it in the next section in this guide.
Don’t become completely dependent on a growing schedule
That being said it is also important not to become too dependent on a feeding schedule. While it is true that feeding schedules are good guides to follow when coordinating the growth of several marijuana plants together, you should also pay attention to each plant independently.
Each plant will have slightly different needs as a result of both their individual containers and the surrounding growing environment. You will be surprised at how sensitive each plant is to its specific environment even a few feet away from another plant. Plants can grow very differently depending on where they are in a grow tent.
How to mix nutrients for cannabis
In general, you should follow this basic rule of thumb for mixing nutrients and watering your plants:
- N: high, 6 parts
- K: high, 3 parts
- Should be about half to one-third of the nitrogen
- P: medium, 2 parts
- Should be about half of Nitrogen
- Begin feeding nutrients once the plant has opened its first set of serrated leaves
- Good idea to add some Cal-Mag during veg phase
In the beginning, for 6 parts of nitrogen, you should have about 3 parts potassium and 2 parts phosphorus. In general, you want the potassium and phosphorus to be about 1/2 to 1/3 the amount of nitrogen with a little bit more phosphorus than potassium.
If you want to learn more about nutrients, I wrote a huge guide to nutrients for growing cannabis that covers everything you need to know about nutrients, including suggested brands and recommended ratios for each stage of growth.
How much nutrients should you give cannabis seedlings?
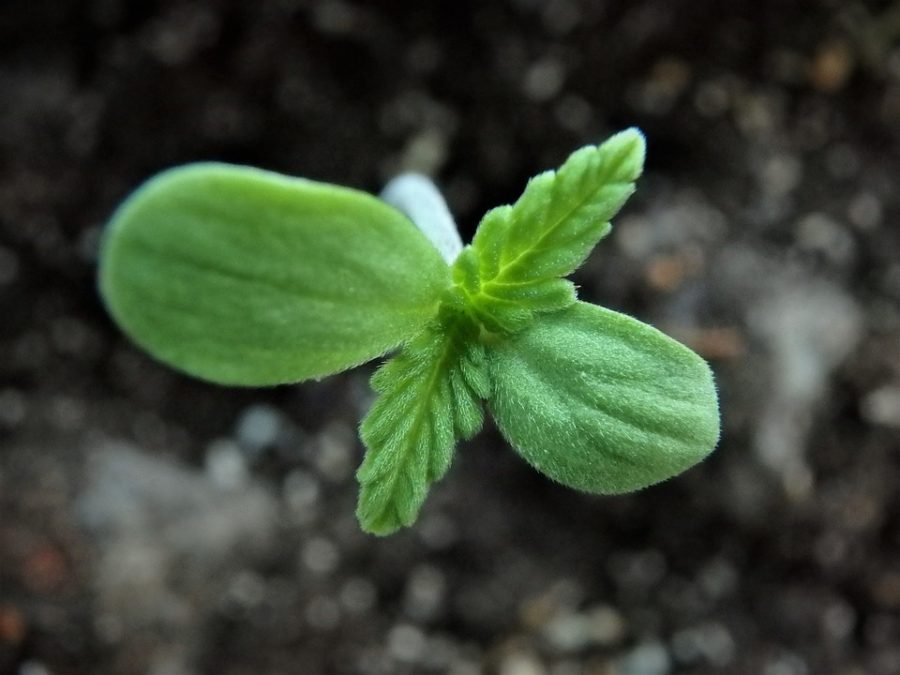
It’s a good idea to hold off on feeding your plants while they are still in the seedling stage. They will be very fragile when they are seedlings, as I discussed during the article I wrote about germinating and planting cannabis seeds.
The seedling stage for weed plants lasts for about a week. It can go a little bit longer depending on the strain. After about a week, the first set of serrated vegetative phase leaves will sprout. When this first set of mature leaves opens up, you can begin feeding your plants regularly.
Another thing to note is that depending on the type of growing medium you are using, you may want to add some cal-mag to supplement the number of trace nutrients in the grinding medium.
Many soils contain enough Cal-Mag so you won’t have to worry about this at all for the duration of the growth cycle. However, if you are using coco coir or other clean growing mediums then you should consider adding cal-mag to your feeding mix in the beginning in order to supplement your plants.
Adding a few extra trace nutrients will ensure that you deliver the correct mix of nutrients to the young plants to promote their growth in the early stages. Those ratios are tried and true. If you find differing suggestions from other sources, test them out to see which works best for you.
How to create a feeding schedule
Basic overview of watering schedule for marijuana
Below is a basic watering schedule for Autoflower plants. you may choose to follow a different feeding schedule but this schedule will get you started and give you the basics for growing the easiest kind of weed plant to grow. from this schedule feel free to innovate and adjust as necessary.
Overall the feeding schedule will look something like this:
- Week 0-1: No nutrients at all, just pH balanced water
- Cal-Mag: 0 ML
- Micro: 0 ML
- Gro: 0 ML
- Bloom: 0 ML
- This prevents you from overfeeding your sprouts and burning them
- Week 1 (per gallon)
- Cal-Mag: 2 ML
- Micro: 1 ML
- Gro: 1 ML
- Bloom: .5 ML
- Weeks 2-4 (Veg stage)
- Cal-Mag: 2 ML
- Micro: 2.5 ML
- Gro: 2.5 ML
- Bloom: 1 ML
Month 1: First Month Watering Schedule For Early Vegetative Growth
Week 0-1: From seedling to sprout
For the first week of life seedlings do not need much help. All of the energy that a young sprout needs to grow is contained within the seed. Because seeds contain all of the energy needed to help a new plant coming to existence, all you need to do for the first week is add water.
One of the main reasons to not feed a young seedling is that they are so delicate that you can easily overfeed them and cause nutrient burn. If you feed a young plant too much nutrients they may burn and the burn is permanent.
Burning a plant at such a young stage will not only damage its potential for growth in the weeks to come, but it could also doom the entire plant right off the bat. That’s why it is advisable to hold off on feeding until after the first week.
When watering a young sapling make sure not to over water. It is easy to drown saplings. Beginner Growers who have less experience with gardening may be excited and worried that their soil is not looking wet enough. Resist the urge to over water.
If you are watering your sapling or seedling more than once per day or giving it more than 122 oz of water at a time then you maybe over-watering your seedling.
Watch pH levels in young cannabis plants
When you water make sure that the water is ph-balanced. Young seedlings are extremely sensitive to pH imbalances. At such a young stage most seedlings will require well balanced pH water in order to absorb nutrients through their small young Taproot.
When you are preparing to water your seedlings use your pH meter to make sure that the water is between 6.0 and 6.5 pH. If the water is outside of this range use ph up or PH down to balance the water properly.
A good way to make sure that the paper towels are wet but not too wet is to put a little bit of water in a dish and let the paper towels soak up as much water as they can naturally. Then lift the paper towels up without squeezing them and let the excess water drain out.
Week 1: First watering and feeding for cannabis plants
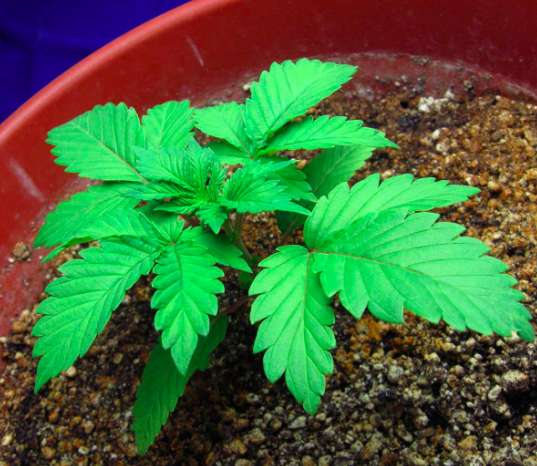
After the first set of serrated leaves have opened, you can begin feeding marijuana plants nutrients. The reason you should to wait for the first serrated leaves to open is that these are the first leaves that will begin to produce the hormones and boost the growth of the plant.
Over all, these serrated leaves are the powerhouses of the plant and will produce most of the energy that the plant uses in order to add height. When those first leaves open you can begin adding fuel (nutrients / fertilizers) to make sure that the leaves have everything they need to reach their full potential.
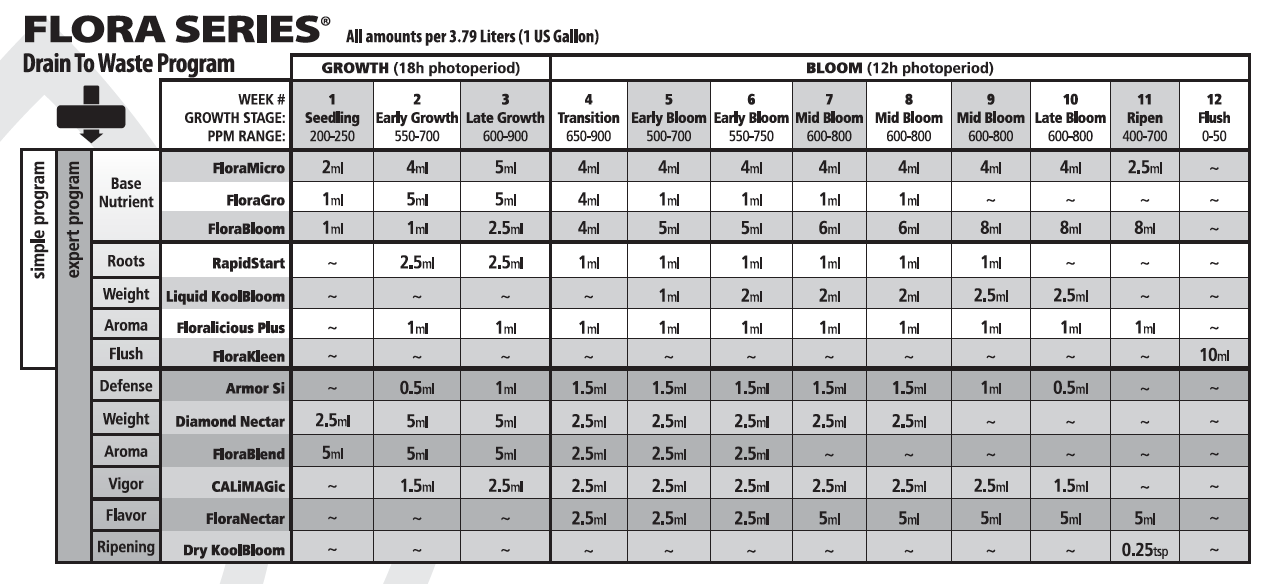
First early vegetative growth nutrient feeding
Mix up your first batch of nutrients. As I described in the complete guide to nutrients that I wrote for you in the previous stage of this guide, you want to make sure that you add the nutrients to your water in a very specific order In order to avoid nutrient lockout.
For the purposes of this guide I am relying on Flora grow brand of nutrients.
1. First, add cal-mag (optional)
2. Second, add Micro
3. Third, add Grow
4. Fourth, add Bloom
If you are using a different brand of nutrients, make sure to check recommended dosages of each type of nutrient and add them in the right order as needed. Once you have added all of the nutrients to the water, stir the water and then measure the pH. Always balance the pH after adding the nutrients.
If you are using Coco coir (not soil) as your growing medium, you should consider watering the plants once per day. Make sure that you flush the plants before each feeding.
To flush the plants pour 1 to 2 full servings of water into the growing medium around the plant and let it drain out completely over the course of 10 to 15 minutes. After the flushing is complete, the medium should be completely free of nutrients. That means that when you add your nutrients to the soil during feeding they will be starting from zero and there will be no nutrient build up.
The first week of a young plants life is a very delicate time. Pay close attention to your plants and make sure to address any signs of issues such as nutrient deficiencies or nutrient burn as soon as they arise.
If you notice that the leaves of your plant are drooping or if they look waxy or discolored, you may have a problem. It is not uncommon for young plants to develop issues within the first week or two of the growing schedule. At this point, if you address them quickly, you can avoid long-term damage.
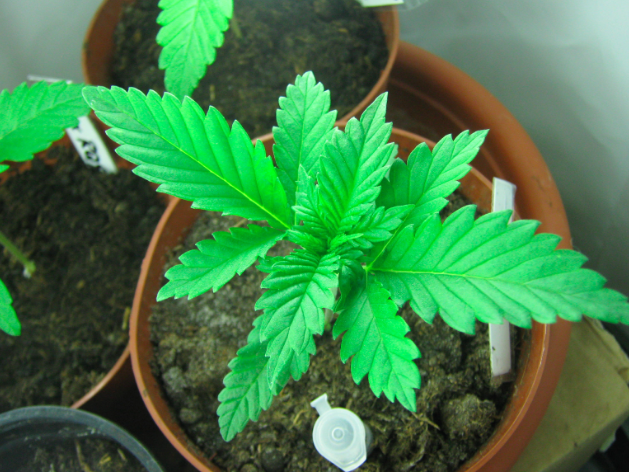
Week 2 – 4: Training And Topping Cannabis Plants
After your plants have settled into their growing schedule for a week or two, you can begin to increase the amount of nutrients that you feed them. For autoflowers, it is important to feed them well in the early vegetative growth phase because they will add most of their height at this time.
Using the above recommendations as a rule of thumb, increase the nutrients in you’re feeding solution while maintaining good feeding habits.
Training Cannabis Plants
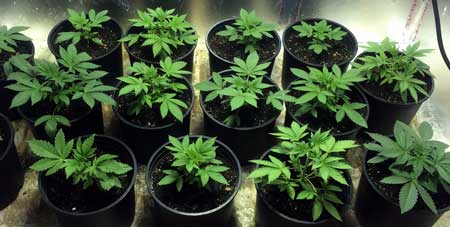
During weeks 2 to 4 your plants will grow substantially. They will add about a third of their total overall height during this time. As a result this is the time when you should begin training the plants so that they grow into a position that gives them enough room in your grow tent to produce as many large colas as they possibly can.
Training cannabis plants is a fairly simple process but it does take a little bit of practice to get right. Later in this guide, we go over some techniques for training cannabis plants, so scroll down to learn more.
Topping Cannabis Plants
Weeks 2 though 4 are also the time when you can top your plants. Topping marijuana plant forces it to produce multiple bud sites. Each bud site can produce its own large cola.
As a result, each time you top a plant, you double the number of bud sites. If you top your plants twice then you will end up with 4 Bud sites where flowers can form and colas can grow.
That is a good way to boost your yield substantially without adding more plants or taking up more space in your grow tent with pots. We will go over how to top your plants properly further below.
How to train marijuana plants to take full advantage of the growth area under the grow light
Step-by-step instructions for training cannabis plants
Training marijuana plants is an essential task for any grower who wants to maximize their yield. This is a low-stress training method that is perfect for beginners who are just getting started growing marijuana.
Unlike high-stress training methods such as topping, this low-stress training method is a simple and easy to perform task that will give your plans more room to grow and help them produce larger colas.
Plants are easiest to train at the beginning of their growth stage so it’s important to start training them fairly early. As soon as your plants develop two or three pairs of serrated vegetative leaves you can begin training.
At the same time, your plants will also be more fragile when they are younger, so growers sometimes prefer to wait until at least four or five pairs of fan leaves have grown out. The decision is up to you.
The purpose of training marijuana plants is to guide their growth away from each other so that, as the plants grow bigger, they do not crowd each other. The plants can be trained away from each other so that they expand across all of the area of the grow tent underneath the grow light.
By training them in this way, you will maximize the usage of the grow light and give your plants enough room to grow nice, big, tall colas later on in the flowering stage.
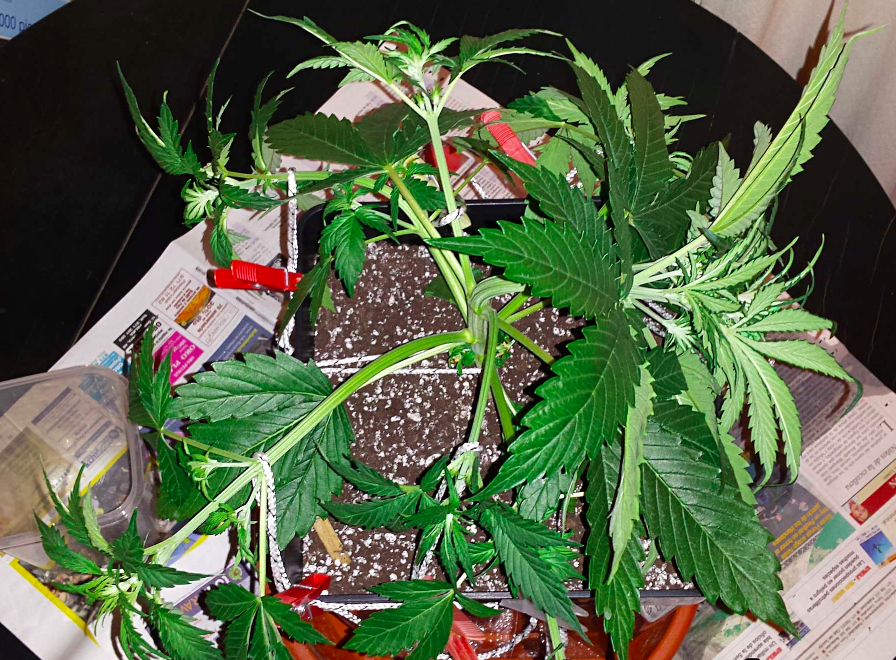
Step 1: Aquire plant ties
To begin training your plants you will need soft coated wiring or plant ties. Do not use string or any other material that could damage your plants. string and Twine can cut into the stock of the plant over time so they should be avoided. Always use plant ties from a gardening stores that are specifically designed for training plants.
Step 2: Tie the plant tie around the stalk of the cannabis plant
Select a piece of the plant tie that is about 2 to 3 ft long. Tie it around the stalk of a marijuana plant right above the first pair of serrated vegetative growth leaves. Be very careful not to tie it too tightly.
Step 3: Gently bend the cannabis plant to the side
Bend the stalk slowly and gently until it is pointing horizontally away from the center of the pot. This step is a bit tricky because you need to be careful not to break the stem. A good rule of thumb is to bend the stem no more than 90 degrees.
Step 4: Tie the other end of the plant to the side of the pot or container
Tie the other end of the plant tie around either the edge of the pot or onto frame of the grow tent. If there is no good place to tie the other end of a plant ties, you can buy a clip that will clip onto the top of the rim of the pot and give you a ring around which you can tie the plant ties.
You can also tie a length of string around the circumference of the container, and then tie the plant ties to that. Make sure that the plant ties is tight but not too tight. It should simply hold the plant in the position in which you bent it without pulling on the plant anymore.
Step 5: Monitor and adjust as needed
Plants are very resilient and they will bounce back from bending within a few days. It looks a bit strange to have all of the leaves pointing diagonally away from the grow light at first. But within 24 to 48 hours, the leaves will reorient themselves upward and adjust for the new bend in their stock.
The most important thing to remember when performing this procedure is to take your time. There is no rush so go very slowly. The slower you go the more likely you are to successfully train your plants without breaking them.
If you are worried that you been a plant too far for that you might accidentally break a stalk, just skip this step. Training helps growth overall, but is not entirely necessary. So if you are unsure, when in doubt, just relax and let your plants grow without training.
How to top cannabis plants to create more colas and increase the maximum yield of your grow
Step-by-step instructions for topping cannabis plants
Topping cannabis plants allows you to double the number of bud growing sites on each plant while also making sure that the plant is putting all of its energy into bud sites, not just adding vegetative volume.
Topping is just one part of a longer and more complicated process called mainlining. We will not go into mainlining here, but we may cover it later in a more in-depth article. To learn about mainlining, check out growweedeasy.com’s guide to mainlining.
One thing to know before topping a cannabis plant says that if you are a beginner it’s best to master other forms of low stress training before trying this technique. Bending and training plants is low stress while topping is high stress. It is best to start with low stress while you get more comfortable with growing and your skills improve.
Low stress training is great for beginners because it allows you to maximize yields. It also teaches you the basic techniques you will need in order to use more advanced techniques such as topping. So if you haven’t done any low stress training before it is best to work on that first.
Also you should never top a cannabis plant that doesn’t have at least five pares of fan leaves growing out of the stalk. The point where each pair of fan leaves meets the main stalk is called the node. Make sure that you see at least five nodes before beginning the process of topping.
Topping a plant when it is too young can kill it or cause damage that will impair growth later on. Always make sure to top cannabis plants when they are ready and no sooner.
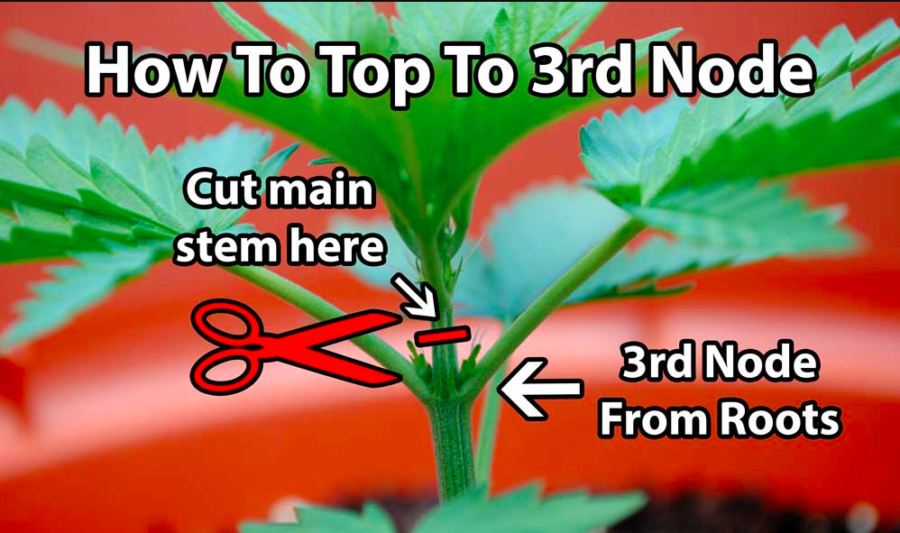
Step 1: Cut the main stem just above the third node
When your cannabis plants have five or more nodes they are ready to be topped. The first step is to locate the third node from the bottom of the plant. With a pair of pruning scissors cut the top off of the plant at the third node.
Leave a little bit of the stalk above the third node and fan leaves. If you do not see small bud sites or flowering sites at the third node, then do not top your plants yet. Wait until you can clearly see that the plant is producing new stalks at this node before topping.
Step 2: Trim the remaining fan leaves
Once you cut the top of the plant off at the third node, you can begin pruning the bottom two pairs of fan leaves off of plant. Do not remove the fan leaves from the third node. Just trim the leaves from the bottom two nodes.
Remove any extraneous leaves so that all of the plants energy will be focused on the pair of fan leaves at the third node. You must keep the third pair of fan leaves so that the plant has enough foliage to promote growth. Keeping these fan leaves will help the plant grow faster and recover from topping more quickly.
Step 3: Train the smaller leaves down
Using plant ties, gently bend the smaller leaves at the 3rd node down so that they are no longer pointing up. The two leaves that you are aiming for are actually new stems. These two stems will take over from the growth that was happening in the main stem before you topped it.
These two stems will grow as brand new main stems and, by tying them down, you will help them grow out laterally so that they each have enough space to produce nice big cola. This will also help them produce a sturdy ‘T’ shape, which will become the foundational structure to hold up the rest of the plant as it grows.
If you are worried that two new main stems are not big enough to be tied down immediately, then give them a few days of growth so that they can grow larger before tying them down. When in doubt, it is best to wait and let the plant recover a little before completing the process.
Step 4: Repeat
After a few days, the two new main stems will have adjusted their position and turned to face upwards again. When the two new main stems have turned upward, they are indicating that they have recovered from the stress that they were put under. Eventually these news main stems will begin growing their own fan leaves.
The two new main stems will grow one or two nodes with new pairs of fan leaves. When you see new nodes on each main stem, you have the option of topping them again. Simply repeat the above process for the two new main stems in order to create four new main stems.
This is an optional step and will maximize the yield you get out of your plants. Theoretically, you could continue to top your plants several more times, but in reality, plants generally have a hard time supporting more than 4 main stems.
3 Tips: How to care for your weed plants during vegetative growth
1. Apply pest control solution to your cannabis plants during early vegetative growth
Pest control is a major priority for any grow, and its important to start thinking about it during early vegetative growth. There are many different types of pests that can affect your plants such as fungi, mold, mites and other insects. Thankfully, early preventive actions can protect your plants from most of these critters.
It is best to apply pest control solution to your plants throughout the vegetative phase beginning during early vegetative phase. The reason is that, as your plants go into the flowering stage, you don’t want to put any chemicals on them that could end up in your bud.
Also, many pest control solutions take a while to kick in. So by adding pest control solutions to leaves of your plants early on, you can protect them for the long-term without affecting the quality of the buds that will eventually grow on your plants.
There many different types of pest control Solutions. Organic pest control solutions like neem oil tend to be the best bet because other chemicals could end up in your buds. Nobody wants to end up smoking pesticides or other chemicals.
Neem oil healthier than other organocides, and if it does end up in the product at the end of the growth cycle, it will taste bad but it won’t harm you as much.
Once you have chosen a pest control solution, apply it to the leaves using a spray container with an elongated nozzle or hose so that you can reach between each plant and under every leaf adequately. Don’t forget to cover the entire plant including the top of the grow medium and the undersides of the leaves.
You may need to apply Pest Control solution several times during grow phase. Follow the instructions for the specific pest control solution you buy. Also, if you do find yourself reaching between stalks, be extra careful not to damage your plants by breaking stems or leaves.
2. Make lighting height adjustments as your plants grow
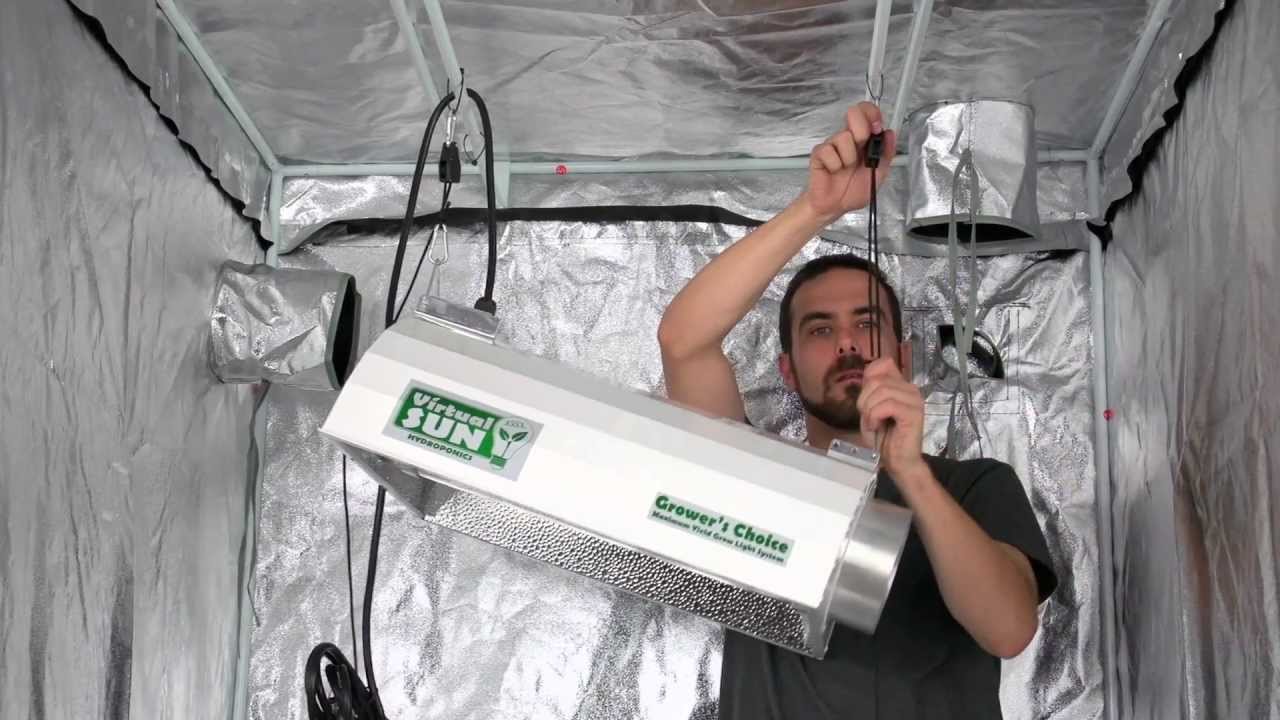
As your plants grow, you will need to adjust the height of the lights that are hanging above them. During the early vegetative growth phase, the light should be hanging about halfway down the length of the grow or about 2 feet away from the tops of the plants.
Make sure that you leave at least two feet of room between the tops of the plants and the grow light so that the plants are not affected by any heat that is coming off of the light.
As the plants grow you will need to periodically raise the light in order to maintain a proper distance between the light and the plants. Some beginner growers think that the closer the light is to the plants, the more energy will be delivered to the plants.
That is technically true, but because of the heat coming off of the lights, it is more important not to put the lights too close to the plants, otherwise they might get burned. Additionally having the lights a few inches closer to the plants usually will not make any noticeable difference in the size or quality of buds.
If you noticed that a lot of heat is coming off of your grow light and is affecting the plants, make sure to lift the light as high as possible while still maintaining a good amount of direct light coverage over the entire canopy.
Also, adjust the fans within the grow tent to dissipate as much of the heat away from the tops of the plants as possible. You may need to add more fans to boost the ventilation system.
3. Pay attention to humidity levels during the early days

Proper humidity control is one of the keys to a successful grow setup. Without humidity control it will be very difficult to manage the humidity within the grow tent and provide the plants with the right amount of humidity.
Too little humidity and the plants will dry out. Too much humidity and you risk causing the plants to rot.
The best way to control humidity within the grow tent is to use fans, dehumidifiers, and humidifiers. You can find many different dehumidifiers and humidifiers to fit your grow tent, but I have also compiled a list of a few good ones for you on the equipment page. Use a dehumidifier to remove excess water from the air and use a humidifier to add water.
If you notice moisture accumulation on the walls of the grow tent or any other surface in the tent, check the dehumidifier and humidity levels to make sure that everything is calibrated properly. It is difficult to remove humidity from the air inside of a grow tent without a dehumidifier.
But if you do not have a humidifier and are noticing that your plants are drying out or wilting, make sure to add extra water during feedings. You can also leave an open tray of fresh water out in the grow tent so that extra water is evaporating into the air.
Bonus Tip: Temp control in the tent
Temperature and humidity levels work together. If you’re having trouble controlling humidity levels, you may also have trouble controlling temperature levels.
Cannabis requires very specific temperature ranges to grow. They like to be at around 70 degrees Fahrenheit at all times.
Grow lights can create a lot of heat in a grow tent. During the early vegetative growth phase, when the grow lights are on 24/7, heat build-up can cause a lot of problems if it is not adequately controlled.
In order to adjust for any excess heat that might be building up from a grow light, aim a fan across the grow light so that air is being pushed around the grow light. Position a fan to specifically blow air between the grow light and the tops of the plants.
Better yet, point a fan across the tops of the plants underneath the grow light at the main vent system for the grow tent. That way, the air is being pushed towards the ventilation system where it can be sucked out of the grow tent.
If heat really does become a huge problem, make sure to consider buying a dehumidifier and a small air conditioner. Head over to the equipment page I created for a discussion of air conditioners and dehumidifiers that might be good for your setup.
Conclusion: early vegetative growth is just the beginning
The early vegetative growth stage is an exciting time. This is the phase where you will get to see your little sprouts grow into full mature plants and begin their journey toward the flowering stage.
This is a delicate time in the life of your plants. They will require a lot of care so that they make it to the late vegetative growth phase, where they will be ready for scrogging.
Quick tip: keep a journal of every watering and feeding you give your plants. Also, write down the daily readings of humidity and temperature levels within the grow tent. Write down as much information as you can in your daily journal so that if something goes wrong you can figure out what the cause is more easily. If you notice your plants are struggling you can look at your journal and see if you made a mistake somewhere along the way.
During the early vegetative growth stage you will get to know your plants as individuals and see which plants have specific needs. While you will also be implementing a watering schedule to help you give your plants consistent nutrients, it is important to pay attention to each individual plant and not treat them as a group.
By treating them as individuals you will be able to better take care of them and detect any problems as soon as they arise.
For beginner growers, low-stress training is a good way to maximize yields and learn some some basic training techniques. If you already know how to train cannabis plants, then topping becomes more achievable.
Topping is an advanced high-stress training technique that will double or even quadruple the number of colas that your plant can produce. This is a great option for advanced Growers who are ready to maximize yields.
When you are ready, head on over to the next phase: Late Vegetative Growth.
Free How-To Guide For Growing Marijuana
Subscribe to our newsletter to receive a free downloadable e-book version of our complete how-to guide for growing marijuana. Don't worry! We won't spam you or send you useless emails.
Connect with us on social media: